Monday, July 18, 2011

Living Room Updated...for now

I showed y'all the living room right after we painted, here.

For a few days it looked like this.


and this...


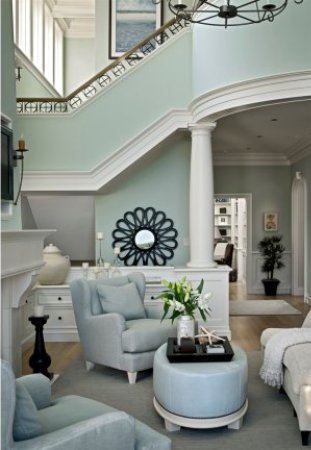
Then it looked like this!


I finally got the mirror hung that I got on sale at Hancock Fabrics as mentioned here.


In the same post mentioned above, I told y'all I wanted to find some lamps to go on either side of the television. I sort of knew what I wanted, but couldn't find any I liked for a cheap reasonable price. I saw ones at Big Lots that I LOVED,but for $49.99 they could keep them! I mean, isn't Big Lots a discount store?? Maybe I'm wrong.

Once I saw them, I decided that I wanted clear glass lamps with drum shades. I thought, surely I could find some somewhere for around $30 a pop.


Wrong.

I started at a Memphis Target and worked my way around town. I stopped by TJMaxx, Marshalls, Gordmans, JCPenneys, Kirklands, Pier 1, and finally the Target in my own town.

I called Kevin when I left Penney's and told him he was probably in luck and I wasn't going to spend any money because I couldn't find any lamps I liked for a good price.

My last stop was our Horn Lake Target. It was getting late and I wasn't expecting much after the day I had.

But as luck would have it, there were FOUR lamps almost exactly what I wanted on CLEARANCE for $19.99 a piece!!

SHUT UP!

I quickly snatched two of them up! They also had drum shades on clearance for $9.99 a piece. They weren't really what I was looking for for the matching lamps,but I knew what I wanted to do with it!

 Here is the link for the lamps, they are not on clearance on the website yet! And the link for the shades, which are also not marked down yet. So I really scored!

You know that lamp that I switched the shade on last week?


I knew I would have a use for those two matching shades! I switched the lamp's shade out again for this one with the navy trim(which I may or may not cover with a different color ribbon, depending on the curtain choice).


Here is a shot of the lamps in place on either side of the TV.


Doesn't it look so much better??

I couldn't agree more! :) 

I'm so happy with the outcome. Although, I am seriously contemplating either gold leafing the mirror or spray painting it with a bright shiny gold color! There is a lot of silver going on with the lamps and mirror.

The room looks so much more put together. I have been struggling with the layout of this room, but I think I finally like the look, for now....


We plan to change out all the door hardware to match and it will probably be a brushed nickel. But since we plan on selling in the next year, we don't want to spend money on stuff that may not be worth the effort, so we are still deciding on that. We also plan to find something to place next to the dresser in leiu of the jutting-out-in-the-way footstool to cover the cable wire that shows.

Soon, we will be building wood cornices for the matching windows and I will try to decide on curtain options, which is a whole other post!

What do you think of the makeover so far?? Should I change the color of the mirror or keep it?

Wednesday, July 13, 2011

Shade switcheroo

After we painted and started bringing everything back into the living room(or shall I say attempted, since it now looks like we just moved in since there is hardly anything on the walls).  I decided to make a quick switcheroo on the floor lamp that came along with the hubby when we moved in. Before it was an ORB with a standard beige colored shade.


And after, well it's still ORB, but has a brand spankin' new shade!!


I picked up two twin drum shades on clearance at Target because I just knew I would use them one day :) Sad, I know.


But, they were half price and the only two left. I was sure they would be gone and would have a hard time finding others I liked for a good price! And I DID put them, well one of them, to good use! It probably won't stay this way, but we will see.

So a quick before and after to wrap things up. What do you think? Better with the drum shade or keep original shade??


Tuesday, July 12, 2011

The living room is FINISHED!!

and by finished, I mean, it will never be painted again(by us at least)!

Everything is still in disarray and hardly anything is back in its place. Except the furniture and the TV. Heaven forbid we not have cable or access to the dang Xbox.  But I have a lot to do. We need window treatments, I'm thinking the desk is clashing with the walls, and I need to figure out how to make slipcovers for our curved-back chairs and I need two matching lamps for either side of the TV.

Anyway, here is the before. It was a yellow-greenish-tan mess. Not a bad color, but not GREAT!


The dresser you see holds our massive flat screen. Not thrilled that it is the focal point of the room, but let's face it, we watch some TV here! Maybe one of these days I can figure out a way to disguise it, like framing it and mounting it...?

After forking out $60+ on Valspar primer and paint in one, I talked to a guy at Sherwin Williams and he told me that Lowe's and HD market their paint to make customers believe that you only need that expensive paint. However, if you want the true color, you need to have a blank slate. In other words, the only way for paint to really show true tones is to prime your walls with white(or slightly gray)primer and then paint. Makes sense to me!  But, I wasn't happy after I paid over $60 then another $15 for a gallon of primer. Next time, I will just prime and buy the regular ol' plain paint and save myself about $20 and some stress! After we painted, we only used about a quarter of the second gallon we bought, anyway.

Here it is primed


And here it is FINISHED!!


We managed to get this painted canvas, that we scored on CL for $30, up above the sofa. This sofa will be the death of me. I.hate.it. It slumps in in the back and is basically impossible to get off of. I have vowed that there will be a new sofa in this room by the beginning of the year. Crossing my fingers!! 

It has taken me a couple of days to get used to the wall color. It wasn't love at first sight like I thought it was going to be. But, it's growing on me.


Look how well the painting blends with the paint color!


On the opposite side of the room is our massive TV and a CL dresser. I hope to find matching lamps to flank either side of the TV or something of the sort.

In the photos, the color looks more sage-y, and it actually is a bit more sage than I expected, but I think I like it.

Here is the desk against the walls


Remember, this was right after painting, so please excuse the disaster area!

The matching slipper chairs were purchased last month at a community yard sale for wait...$35 for the pair!

Can you believe it? They are only about a year old and she decided they didn't work in her bedroom anymore! Absolutely pefect condition! I thought I could live with the fabric, but I'm thinking about reupholstering or slipcovering. I would rather sew a cover, but everytime I think about it, it makes me cringe. How am I going to make it tight around that curve in the back?  Any ideas..or tutorials I should know about?

Check out these stems!!


Gorgeous!

So, the desk drawers are clashing and now I'm contemplating what color to paint them.

White to match the body?
Gray?
Bright color??
Any ideas are welcome!

Friday, July 8, 2011

Master Bedroom


I have been really working trying to get my master bedroom just perfect. It's taking longer than expected(nothing unusual here). We painted the room a couple of months ago and it is Philipsburg Blue from Benjamin Moore matched at Home Depot in Behr paint/primer in one.


So far, I've tackled diy curtains in fabric I got on clearance for $5 a yard at Hancock Fabrics(with this tutorial, I used the tab method), 2 euro pillow shams and a small accent pillow in another fabric I got on clearance for, are you ready?? $1.50!! I amaze myself sometimes! :). I also picked up a simple white queen duvet set with two shams from Target for $24.99. I have been looking all over the net for a simple white duvet cover and couldn't find one for less then $30. This one included two shams and I was able to check the quality before purchasing.

I am currently working on the headboard. I made one a few months ago from plywood and micro-suede fabric to mimic this one


Pottery Barn

Mine just turned out looking cheap and diy. Even though I did it myself, I didn't want it to look that way. It was too flimsy looking and just, well, plain. When I was searching for paint colors I came across this bed and fell in love.

Not sure of the source, if anyone knows, help me out :)

I thought for sure this was the bed for me! Then I saw this post from View Along the Way and she built her whole bed, including frame and slats to hold the mattress! She has a great tutorial and material list including prices!


Nice huh??

I tried the same approach and used her ideas to make close to the same shape. I wanted mine thicker than the first one I made to look more professional and had some foam insulation on hand. I figured it's better to use free materials then spend the money on foam, which can add up! I cut my shape with the jigsaw and glued the insulation to the plywood. I then used a hacksaw to cut the insulation. It's pretty thick stuff and not flexible by any means! When I went to start stapling the fabric, I had a really hard time. I'm guessing, since the insulation was about 2 inches thick, it didn't want to take the curves well. I couldn't get the fabric to fit tight around the bottom parts of the dome. After 3 hours of stapling and them pulling them out to try a different technique, I gave up on it! I tried again the next day for about twenty minutes and decided that the shape I had chosen was not going to work.

I ended up cutting the dome off to end up with a shape like this


I will be tuftting mine and the nailhead trim will be around the sides and top of the headboard where the wood is, not the front(they won't stay in the insulation).  I have everything finished except the tufting. The holes are drilled, but I haven't made my mind up on whether I should use the linen I used on the headboard or some contrasting ones!! What do you think? Matchy-matchy buttons, or buttons that will pop against the natural colored linen??

I should have pictures of the finished headboard up this weekend! Check back! 

Wednesday, June 29, 2011

Desk Steal

I have been using an old vanity as a desk in our living room for a while now. It was slim and only had two drawers for storage and a cubby where you have to lift the top of the vanity to access it. It was not convenient what-so-ever. I search Craigslist quite often and see old desks all the time that could be easliy updated. It wasn't until Kevin mentioned the fact that we needed a desk for more storage, that I really got to searching! I always get excited when he actually says we need something...it doesn't happen very often. On a Saturday I found two desks almost exactly alike, one for $20 and one for $10. I quickly emailed both ads in hope one was still available. I received an email back that day telling me that the cheaper one was sold.

Bummer. 

The next morning, i receieved an email from the other ad telling me that it was, in fact, still available! I emailed right back asking if I could have it! She told me that if I came and picked it up before 1pm that I cold take it off her hands for 10 smackeroos!! I told Kevin and showed him the picture. He was less than thrilled. You see, he is the one who drives all over Memphis to pick up the pieces I have found on CL. Picking up a desk on a Sunday afternoon was not his idea of fun, especially when I pulled up the address and it was in a less than pleasing part of town. Luckily, when we arrived it was the most cute little quaint house in the heart of Midtown. The houses surrounding were all older, smaller homes and were just adorable! I was so excited to get it home and get to work on it!!

Here is the before


It was a little rough on top, but structurally in great shape!! I knew exactly what I wanted to do with it! I had been eyeing this desk that Miss Mustard Seed finished with the Annie Sloan Chalk Paint found here.


Isn't she lovely?? I think so too! I loved the look of the painted desk and stained top. I actually have a dresser done the same way. I was leaning towards a darker blue for the drawers on mine though. I hit up Sherwin Williams for some $5 samples and covered the whole desk without even making a dent in the samples! I used a foam roller for the sides and a foam brush for the smaller spots. I covered with Kilz primer first and then painted. I distressed with my electric sander. 

And here she is!!


Please ignore the Disney lap pad under the table as well as the plastic bag, this is Kevin's way of hiding cords. In this photo, you can also see why I hate the wall color.


The stain is something I had on hand and I'm not sure of the color.  I cleaned(tried) the brass handles, but they didn't seem to want to polish perfectly. I took that as a sign that they wanted to stay antique looking, so I left them that way. I still want to line the drawers with some fabric or coordinating paper, but we will see if I ever get around to that. In the meantime, we are enjoying all the extra storage this baby brings us! When we get around to painting the walls Sea Salt, the drawers may clash and have to be painted a different color.

Do you think I should paint the drawers white or another color??

Linked up with
southern hospitality

Furniture Feature Fridays


Tuesday, June 28, 2011

Sea Salt and Driftwood

After months of staring at our ugly green-yellow-tannish walls, I have finally decided on a paint color for our living room walls. I have been debating and finally narrowed the colors down to three, Contented by SW, Sea Salt by Valspar and Sea Salt by SW. Luckily, a friend I've known my whole life works at the paint center at Lowe's, any stranger would probably dismiss me after pulling all of the paint fans of brands they don't even carry. After having her mix the 3 colors and taking them home and trying the samples out, I chose Sea Salt by Sherwin Williams.


My official inspiration for this room comes from this bedroom at studio ten 25.


Isn't it beautiful??  I absolutely love the colors and love how bright the paint makes the room feel! Our current paint color is drab and uninviting. The paint color in this bedroom is Rainwashed by SW and is currently in my stepdaughter's room. Rainwashed is a little saturated for our living room, but when I saw Sea Salt in this room,  I fell in L O V E!! I had to have it!


So it's official!! I will be painting the living room within the next two weeks! I'm so exciting to have some bright and relaxing color on the walls and get rid of drab and gross green!

The Z Gallerie mirror in the second and third photo was giving me a panic attack. I wanted.it.now. Unfortunately, it's out of our price range. But I did score a gigantic mirror from Hancock Fabrics for only $39! There was no tag and no info on the mirror to indicate any price. It was sitting in front of another gigantic mirror of the same size and that one was currently $250 on sale 30% off. The young salesperson said he figured MY mirror was the same price. After calling around for over 15 minutes, he told me my mirror was only $39! I wanted to kiss him! Not many people will go out of their way to spend that much time on the phone researching prices. I'm grateful he did! It made my day! 

Now if I can only get my living room to look like this....


I picked this up over at a' la mode. Love the drapes!  I'm not sure of the original source, but the young guest blogger from the post has some wonderful design tips! Check out Michaela at Michaela Noelle Designs!

Also, on a recent trip to the in-law's at Pickwick Lake, I collected a ton of driftwood and shells! I can't wait to get to work collaborating a centerpiece of some sort to tie in the Sea Salt paint! Have I mentioned I love beachy stuff?? Here are some ideas with driftwood and shells I love!


Which is similar to the centerpiece we created for my wedding here


How about this mantle covered in driftwood and seashells! My kinda art. Actually, check out the whole web page filled with driftwood art! Karen Miller is obviously a talented artist, and the alligator made from driftwood!


LinkWithin

Related Posts Plugin for WordPress, Blogger...